- 🎯 Introduction
- ⚙️ Step 1: Choose Your API Provider
- 🤖 Option 1: Configure OpenAI API Key
- 🧠 Option 2: Configure DeepSeek API Key
- 🌟 Option 3: Gemini AI (Upcoming Integration)
- 🧩 Step 2: Test Your API Connection
- 💬 Step 3: Enable the Chat Feature
- 🔒 Step 4: Secure Your API Keys
- 🧠 Why Configure API Keys in AskAny?
- ⚙️ Troubleshooting Common Issues
- 💡 Pro Tips for Advanced Users
- ✅ Summary
- 🧩 Final Thoughts
Table of Contents #
🎯 Introduction #
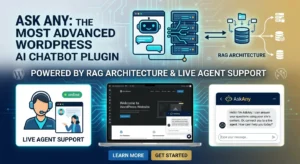
The AskAny plugin by wpazleen brings the power of artificial intelligence directly to your WordPress website.
Whether you’re using it to create an interactive AI chat widget, generate content, or automate responses you’ll need to connect it to an AI provider.
In this tutorial, you’ll learn exactly how to configure API keys in AskAny for OpenAI, DeepSeek, and the upcoming Gemini AI integration.
By properly setting up your API keys, AskAny can securely communicate with your chosen AI model and start delivering intelligent, real-time responses.

⚙️ Step 1: Choose Your API Provider #
AskAny allows you to connect with multiple AI providers for flexibility and reliability.
Currently supported and upcoming providers include:
- ✅ OpenAI (ChatGPT models like GPT-4 and GPT-3.5)
- ✅ DeepSeek AI (for high-performance open models)
- 🔜 Gemini AI (Google AI) — coming soon to AskAny
To get started:
- Log in to your WordPress Dashboard.
- Navigate to AskAny → Settings.
- Under the API Configuration tab, you’ll see a dropdown labeled Select API Provider.
- Choose your preferred provider — OpenAI, DeepSeek, or (when released) Gemini AI.
🤖 Option 1: Configure OpenAI API Key #
🔹 Step 1: Visit the OpenAI API Key Page #
Go to OpenAI API Keys Page (DoFollow).
🔹 Step 2: Log In or Sign Up #
- Existing users: click Log In.
- New users: click Sign Up, enter your email, and verify your account.
🔹 Step 3: Create a New Secret Key #
Once logged in:
- Click “+ Create new secret key.”
- Optionally, name the key for easy identification.
- Copy your API Key immediately — it’s shown only once.
🔹 Step 4: Paste the API Key into AskAny #
In your WordPress dashboard:
- Go to AskAny → Settings → API Configuration.
- Paste your OpenAI API Key into the OpenAI API Key field.
- Click Save Changes.
🧠 Option 2: Configure DeepSeek API Key #
🔹 Step 1: Visit DeepSeek API Dashboard #
Go to DeepSeek API Dashboard (DoFollow).
🔹 Step 2: Log In or Register #
Create or log in to your DeepSeek account.
🔹 Step 3: Navigate to API Key Section #
Once inside your dashboard, open the API Keys section.
🔹 Step 4: Generate a New API Key #
If no key exists, click “Generate API Key.”
Copy your new key immediately.
🔹 Step 5: Paste API Key into AskAny #
Back in AskAny Settings, choose DeepSeek as your provider and paste your API Key in the corresponding field.
Click Save Changes.
🌟 Option 3: Gemini AI (Upcoming Integration) #
The Gemini AI (formerly Bard) integration is an upcoming feature in AskAny.
When released, it will allow you to connect your Google Cloud Gemini API Key for advanced natural language processing and multimodal chat experiences.
🔜 What to Expect: #
- Direct connection to Gemini API through your Google Cloud Console.
- Similar configuration workflow to OpenAI and DeepSeek.
- Support for Gemini 1.5 and future models.
📢 Stay updated by visiting the official Gemini API documentation (DoFollow) for early access and developer news.
🧩 Step 2: Test Your API Connection #
After pasting your API key (OpenAI or DeepSeek for now):
- Click the Test API button next to your key field.
- AskAny will run a quick check to verify your connection.
- If successful, you’ll see a confirmation message:
✅ “API connection successful!”
If you encounter an error:
- Recheck your API key format.
- Ensure the selected provider matches your key.
- Make sure your account has active credits or usage allowance.
💬 Step 3: Enable the Chat Feature #
After successfully verifying your API connection:
- Go to AskAny → Settings.
- Find the Enable Chat option.
- Check the box to turn on AskAny’s smart chat interface.
- Click Save Settings.
Once enabled, the AskAny AI chat widget will start functioning using your selected provider’s API.
🔒 Step 4: Secure Your API Keys #
Your API key grants full access to your AI usage quota, so always treat it like a password.
Best practices:
- Never share your API key publicly.
- Avoid posting screenshots that show your key.
- If your key is compromised, revoke and regenerate it immediately.
- Restrict access in your hosting environment when possible.
Learn more from the OWASP API Security Guide
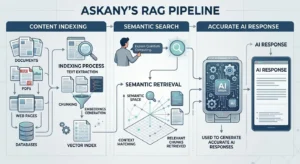
🧠 Why Configure API Keys in AskAny? #
Configuring API keys in AskAny is critical for unlocking its full potential.
Here’s what happens once the key is properly configured:
✅ The plugin connects securely to your chosen AI provider.
✅ You can use AskAny to generate answers, content, and conversations.
✅ You gain access to smart features such as contextual chat, auto-reply, and AI writing tools.
✅ It ensures stable and authenticated communication with the provider’s API.
Without API configuration, AskAny won’t function it’s the bridge that connects your site to artificial intelligence.
⚙️ Troubleshooting Common Issues #
❌ “Invalid API Key” Error #
- Double-check for extra spaces or characters.
- Ensure you copied the key exactly as shown.
- Regenerate the key and try again.
❌ “Connection Failed” Message #
- Check your hosting environment for outgoing request blocks.
- Ensure your provider account (OpenAI or DeepSeek) is active.
❌ “Chat Not Responding” #
- Confirm “Enable Chat” is checked.
- Verify that the correct provider is selected.
For detailed debugging, refer to:
💡 Pro Tips for Advanced Users #
- Performance Optimization: DeepSeek may offer faster responses for high-traffic sites.
- Model Customization: OpenAI users can switch between
gpt-3.5-turboandgpt-4models for improved accuracy. - Future-Proofing: When Gemini AI becomes available, you’ll be able to integrate all three simultaneously for maximum versatility.
✅ Summary #
Here’s a quick recap of how to configure API keys in AskAny:
- Go to WordPress Dashboard → AskAny → Settings.
- Choose your API Provider (OpenAI, DeepSeek, or Gemini – upcoming).
- Generate your API Key from the provider’s platform:
- Paste it into AskAny’s settings.
- Click Test API to confirm connection.
- Enable Chat to activate your AI assistant.
That’s it! 🎉
You’ve successfully configured API keys in AskAny — your website is now ready to harness the power of AI-driven chat and content generation.
🧩 Final Thoughts #
The AskAny plugin makes it incredibly easy to integrate powerful AI engines like OpenAI, DeepSeek, and soon Gemini AI into your WordPress site.
By properly configuring your API keys, you unlock a world of automation, engagement, and AI-enhanced interactivity all from a simple and secure dashboard.
With multi-provider support and upcoming Gemini integration, AskAny is designed to evolve alongside the world’s leading AI technologies.


Leave a Comment
Your email address will not be published. Required fields are marked *