- ✉️ How to Set Email Notifications in Simple Form
- 🔧 Step 1: Open Your Form in the Simple Form Editor
- ⚙️ Step 2: Open Form Settings Panel
- 📩 Step 3: Enable Email Notifications
- 👥 Step 4: Add Notification Recipients
- 🧾 Step 5: Customize Email Subject
- 💬 Step 6: Customize Email Message
- 🧠 Why Setting Email Notifications is Important
- 🧩 Step 7: Save and Test Your Email Notification
- ⚙️ Advanced Email Tips for Simple Form
- ✅ Summary
- 🧩 Final Thoughts
✉️ How to Set Email Notifications in Simple Form #
Table of Contents #
One of the most powerful features in Simple Form by wpazleen is its ability to send automatic email notifications after a user submits a form. Whether you want to receive an alert every time someone fills out your contact form or send a confirmation message back to the user Simple Form makes it simple and code-free.
In this step-by-step guide, we’ll show you exactly how to set email notifications in Simple Form, configure multiple recipients, and customize your email subject and message for professional communication.
🔧 Step 1: Open Your Form in the Simple Form Editor #
To begin, log in to your WordPress Admin Dashboard.
- Go to Simple Form → All Forms from the sidebar.
- Choose the form you want to set notifications for and click Edit Form.
- This will open the Simple Form Editor, where you can modify your form fields and access settings.
The Simple Form Editor is designed for simplicity — everything from styling to notifications can be managed in one place.
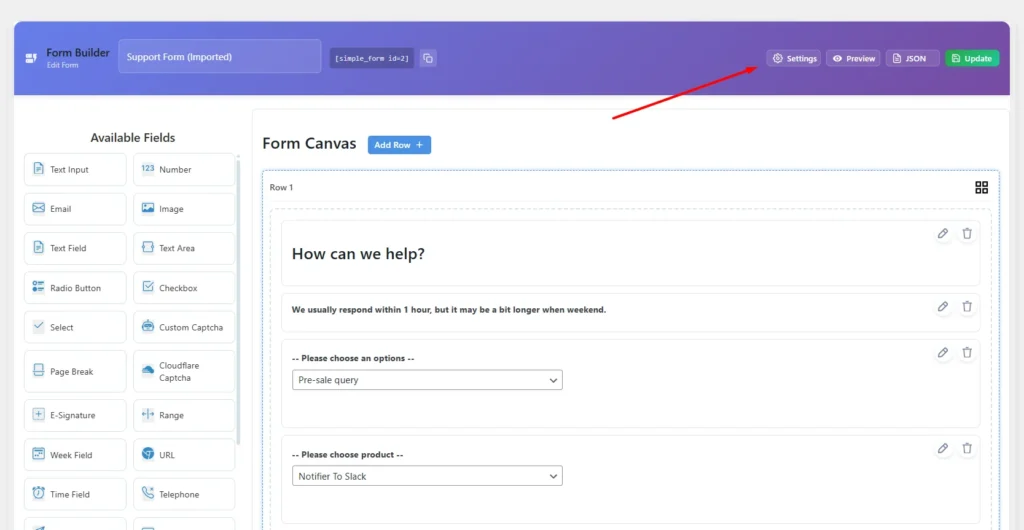
⚙️ Step 2: Open Form Settings Panel #
In the form editor, look at the right-hand sidebar.
You’ll see several configuration icons, including form design, analytics, and settings.
- Click on the Settings icon.
- A settings modal window will open with all available configuration options.
From here, you can control your form behavior, display, redirection, and most importantly email notifications.
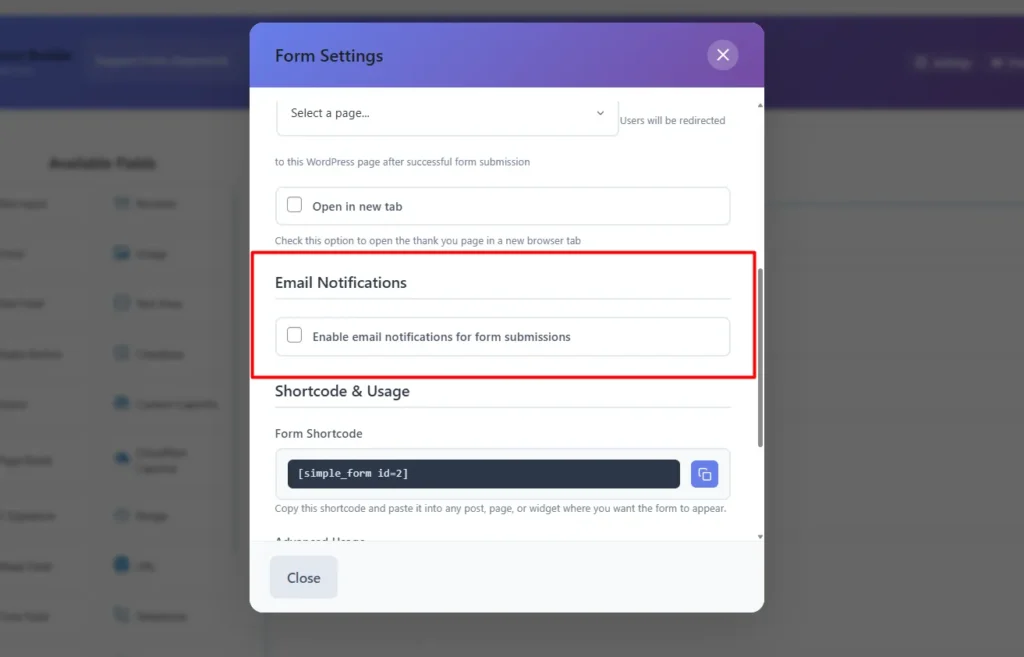
📩 Step 3: Enable Email Notifications #
Inside the settings modal, find and check the “Email Notifications” option.
This enables the email alert system for your specific form.
Once enabled, a set of email configuration options will appear. These include:
- Notification Recipients
- Email Subject
- Email Message
👥 Step 4: Add Notification Recipients #
By default, you’ll see one recipient field. To add more:
- Click the “+” icon beside the Notification Recipients field.
- Enter additional email addresses where you want the notifications to be sent.
- You can add as many recipients as you want (e.g., your support team, sales, or multiple admins).
Having multiple recipients ensures no lead or submission goes unnoticed perfect for busy teams or multi-department sites.
🧾 Step 5: Customize Email Subject #
Next, move to the Email Subject field.
Here, you can define the subject line for your notification email.
A clear and descriptive subject helps you quickly identify the type of form submission in your inbox.
Example subject lines:
- “New Contact Form Submission – Simple Form”
- “You’ve Received a New Inquiry!”
- “Order Request from Website Contact Form”
For best results, include your brand or form name in the subject.
This improves recognition and helps with inbox filtering.
💬 Step 6: Customize Email Message #
Below the subject line, you’ll find the Email Message field.
This is where you can write the body content of your notification email.
Simple Form allows you to use:
- Plain text
- Dynamic form data placeholders (e.g.,
{name},{email},{message})
Example message:
You have received a new form submission via Simple Form.

Name: {name}
Email: {email}
Message: {message}

Please follow up with the user at your earliest convenience.
💡 Pro Tip: You can include links, HTML, and custom formatting in the email message for branded communication.
🧠 Why Setting Email Notifications is Important #
Setting email notifications in Simple Form provides multiple benefits:
- Instant Alerts – You get notified in real time whenever someone submits a form.
- Improved Communication – You can automatically send confirmation emails to users.
- Lead Management – Ensures no potential customer inquiry gets missed.
- Efficiency – Team members receive copies instantly, reducing manual coordination.
Email automation is an essential feature for business websites, and Simple Form simplifies it beautifully.
🧩 Step 7: Save and Test Your Email Notification #
Once you have configured recipients, subject, and message:
- Click the Save Changes or Update Form button.
- Go to your website and submit a test form entry.
- Check the inboxes of all recipients to ensure the email notification is delivered correctly.
If you don’t receive the email:
- Check your spam/junk folder.
- Verify your WordPress email configuration using SMTP (for example, WP Mail SMTP plugin).
- Make sure your hosting provider allows outbound email sending.
You can read more about improving WordPress email deliverability on WPBeginner’s Email Guide
⚙️ Advanced Email Tips for Simple Form #
Here are a few best practices to make your email notifications in Simple Form even better:
🔹 Use Custom Sender Names #
Customize your From Name and Reply-To Email in your email settings to improve clarity.
🔹 Send Auto-Response to Users #
Duplicate the notification and use it as an auto-reply template so users instantly receive confirmation.
🔹 Track Email Performance #
Use third-party analytics or CRM integrations to track email open rates and response performance.
🔹 Secure Your Form Data #
Always ensure you are using a secure email address and HTTPS-enabled forms to protect user data.
You can learn more about professional email communication best practices from Mailchimp’s Email Design Guide
✅ Summary #
To recap, here’s how to set email notifications in Simple Form:
- Open your form in the Simple Form Editor.
- Go to Settings → Email Notifications.
- Enable the option and add Notification Recipients.
- Set your Email Subject and Email Message.
- Save and test your configuration.
Once done, you’ll receive email alerts every time a form is submitted on your website — helping you stay connected with your audience instantly.
🧩 Final Thoughts #
The Simple Form plugin by wpazleen gives WordPress users a powerful, beginner-friendly interface to manage form notifications without any coding.
Whether you run a business website, portfolio, or eCommerce platform setting up email notifications in Simple Form ensures you never miss an opportunity. With flexible options for multiple recipients, customizable messages, and compatibility with SMTP, it’s one of the easiest ways to manage communication automation on WordPress.


Leave a Comment
Your email address will not be published. Required fields are marked *