- What Is WooCommerce AI Product Management?
- Supported AI Providers
- Step 1 - Connect Your AI Provider
- Step 2 - Enable the Required Ecommerce Features
- Step 3 - Create a WooCommerce Product Using AI
- Step 4 - Generate AI Customer Notes for Orders
- Step 5 - Analyze Your Store with the AI Revenue Copilot
- WooCommerce AI Product Management: What You Can Do
- Frequently Asked Questions
- Conclusion
WooCommerce AI product management is now built directly into Shop Explorer. Instead of manually filling in product details one by one, you can describe what you want and let AI generate the product name, price, SKU, stock quantity, short description, and full description automatically. This guide walks through the complete setup – from connecting your AI provider to creating products, writing order notes, and analyzing your store revenue using AI-powered insights.
What Is WooCommerce AI Product Management? #
WooCommerce AI product management refers to using artificial intelligence to automate the repetitive parts of running a WooCommerce store – creating products, filling in descriptions, generating customer notes, and analyzing revenue patterns. Shop Explorer brings all of this into a single dashboard without requiring any external tools or technical setup.
The AI integration supports five major providers: OpenAI, Google Gemini, Anthropic Claude, DeepSeek, and OpenRouter. OpenRouter alone gives you access to hundreds of models from a single API key, making Shop Explorer one of the most flexible WooCommerce AI tools available today.
Supported AI Providers #
Before starting the setup, choose which AI provider you want to connect. Each has different pricing, model availability, and speed. Here is a quick overview:
| Provider | Free Tier? | Best Model for WooCommerce | Notes |
|---|---|---|---|
| Google Gemini | ✅ Yes | Gemini 2.5 Flash | Recommended for beginners – free API key available |
| OpenAI | ❌ Paid | GPT-4o Mini | Reliable, widely used |
| Anthropic | ❌ Paid | Claude 3.5 Haiku | Excellent for long descriptions |
| DeepSeek | ✅ Free tier | DeepSeek V3 | Cost-effective for high volume |
| OpenRouter | ✅ Some models | Any model via router | Access hundreds of models with one key |
For this guide, we use Google Gemini because it offers a free API key through Google AI Studio – the fastest way to get started with WooCommerce AI product management at no cost.
Step 1 – Connect Your AI Provider #
Go to Shop Explorer → Settings → AI Integration tab. This is where you select your provider, choose a model, and enter your API key.
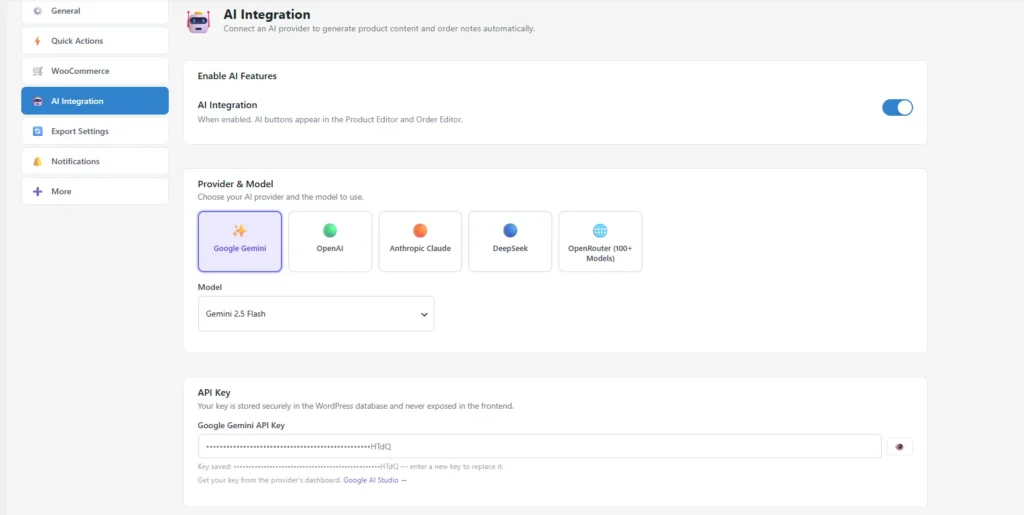
1A – Select Google Gemini as Your AI Provider #
In the AI Provider dropdown, select Google Gemini. Once selected, a model selector appears below. The default selection is Gemini Flash, which is already optimized for WooCommerce AI product management tasks – fast, accurate, and free to use.
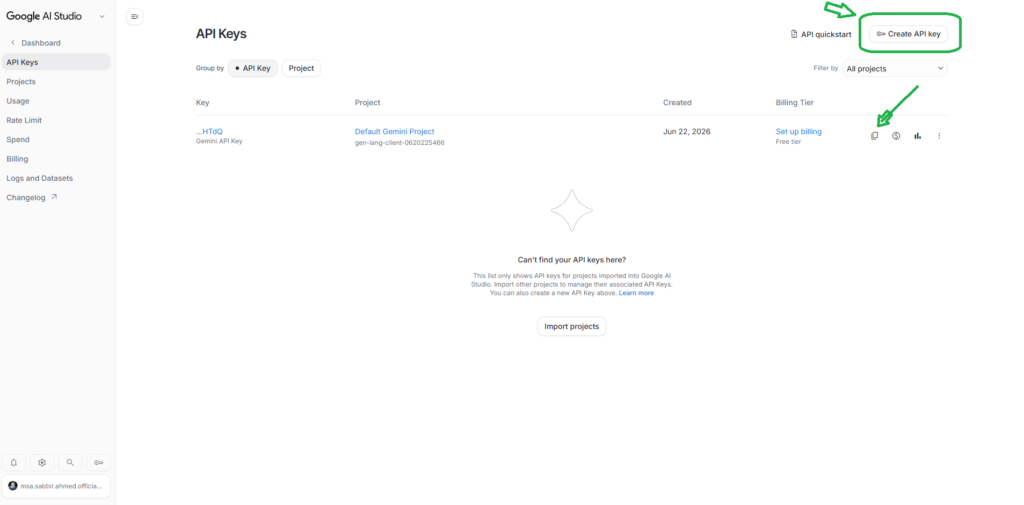
1B – Get Your Free API Key from Google AI Studio #
Visit Google AI Studio and log in with your Google account. Then follow these steps:
- Click Get API Key in the left sidebar
- Click Create API Key
- Name it something recognizable – for example: Shop Explorer Key
- Select Gemini API (not Gemini Project) when prompted
- Click Create API Key in new project
- Copy the generated key – you will only see it once
1C – Paste the Key and Test the Connection #
Return to Shop Explorer Settings → AI Integration. Paste your API key into the API Key field, then click Test Connection. If your key is valid and active, you will see a green success message confirming the connection is working.
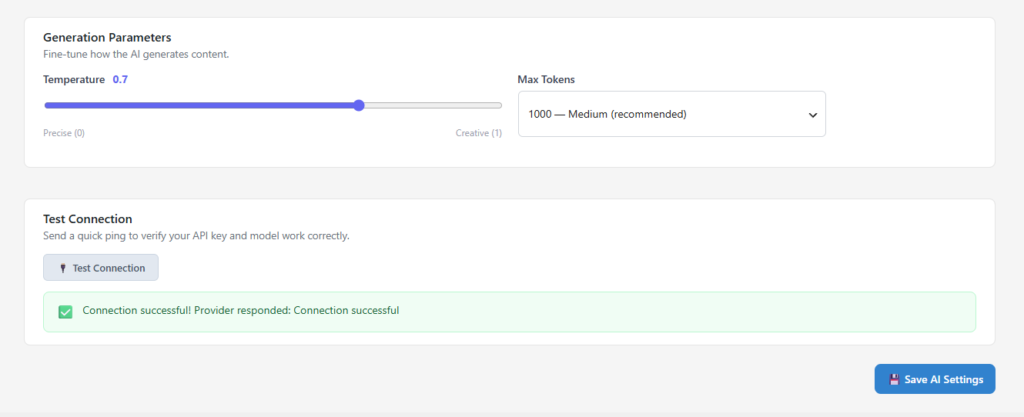
Click Save AI Settings to store your configuration. The AI integration is now active across the entire plugin.
Step 2 – Enable the Required Ecommerce Features #
Before using WooCommerce AI product management features, you need to enable data collection so the AI has store information to work with. Go to Shop Explorer → Settings → Ecommerce tab and enable these options:
- Ecommerce Analytics Tracking – collects revenue and order data for analysis
- Incomplete Order Tracking – monitors abandoned checkouts and partial orders
- Cart Interaction Tracking – records what customers add, remove, and abandon in their cart
- AI Revenue Analysis – enables the AI copilot in the Analytics section
- Bulk Mode – required for AI-assisted product optimization across large catalogs
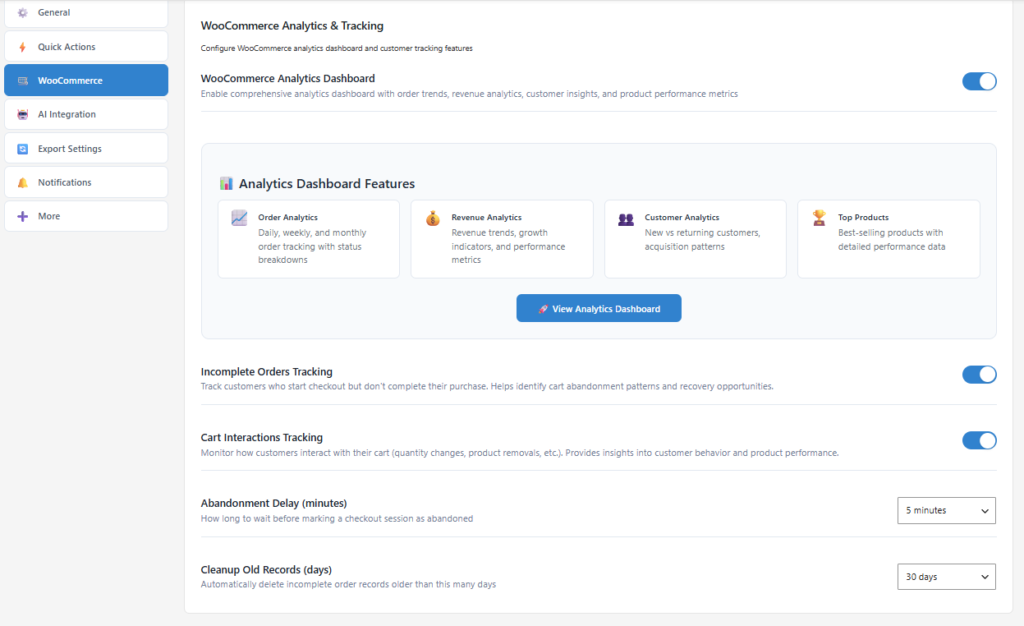
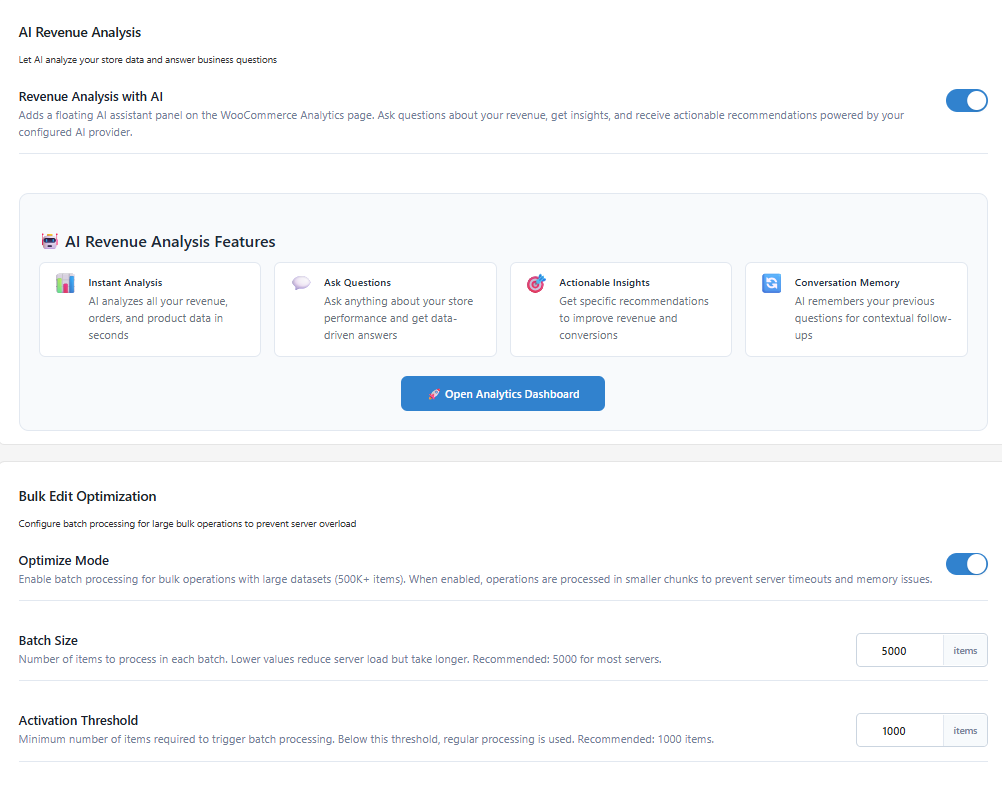
After enabling everything, click Save Settings next to the Refresh button. Your store is now ready for full WooCommerce AI product management.
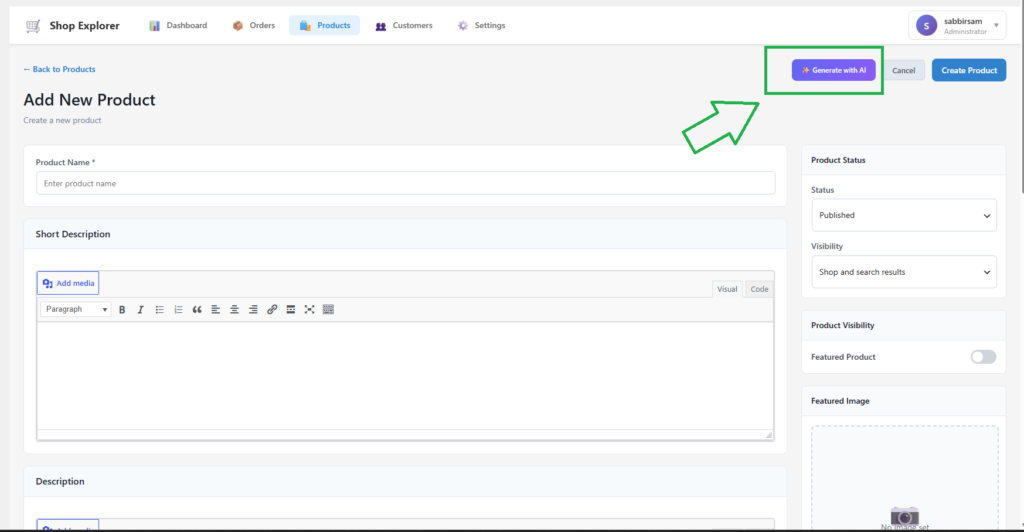
Step 3 – Create a WooCommerce Product Using AI #
Navigate to Shop Explorer → Products. Click Add New Product to open the product editor. Inside the editor, you will see a Generate with AI button – this is the entry point for WooCommerce AI product management.
3A – Write Your Product Prompt #
Click Generate with AI to open the AI Content Generator panel. Type a brief description of your product. You do not need to write a perfect prompt – even a short description gives the AI enough context to fill in the product fields.
Example prompt:
Premium T-shirt with 10 stock quantity. Regular price 120. Sale price 100. SKU: PSA100.
The AI will read your prompt and automatically fill in: product name, short description, full description, regular price, sale price, SKU, and stock quantity. You can also specify the product type if needed – simple, variable, grouped, or external.
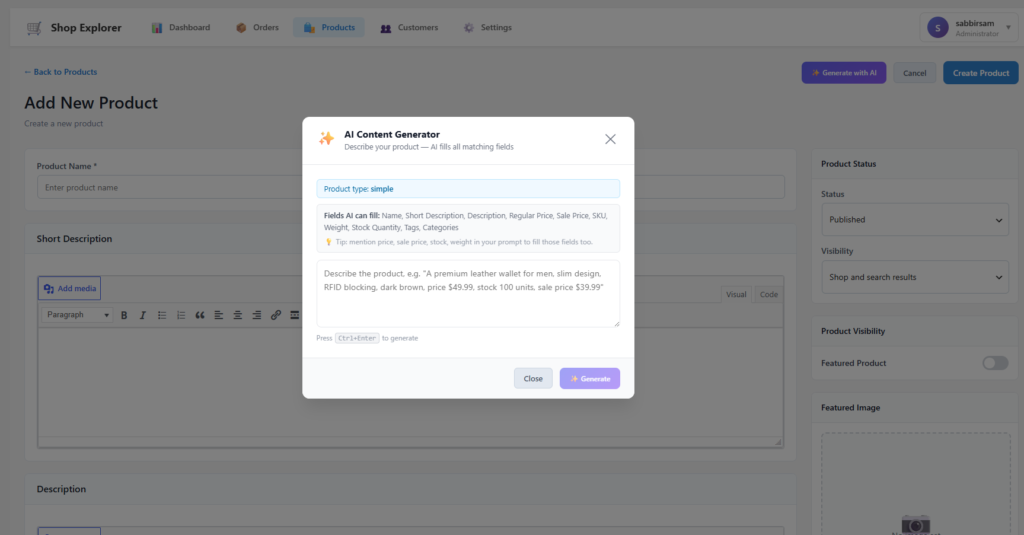
3B – Generate and Review the Product #
Click Generate. The AI processes your prompt and populates all available product fields. Within seconds, your product details are ready to review.
Tip: If you are using the Gemini Flash free model and encounter a rate limit error, simply switch to Gemini 2.5 Flash in the model selector and try again. The paid model handles higher request volumes without interruption.
Once you are satisfied with the generated content, click Create Product. The product is saved to your WooCommerce store immediately.
3C – Improve Existing Product Descriptions with AI #
Open any existing product and click Generate with AI again. Shop Explorer automatically loads the current product data into the AI generator. You can then request just the fields you want to improve – for example, ask for a new short description and a full description without changing price or stock.
Click Generate, review the output, then click Update Product to save. This workflow is ideal for bulk-improving product descriptions across a large catalog.
Step 4 – Generate AI Customer Notes for Orders #
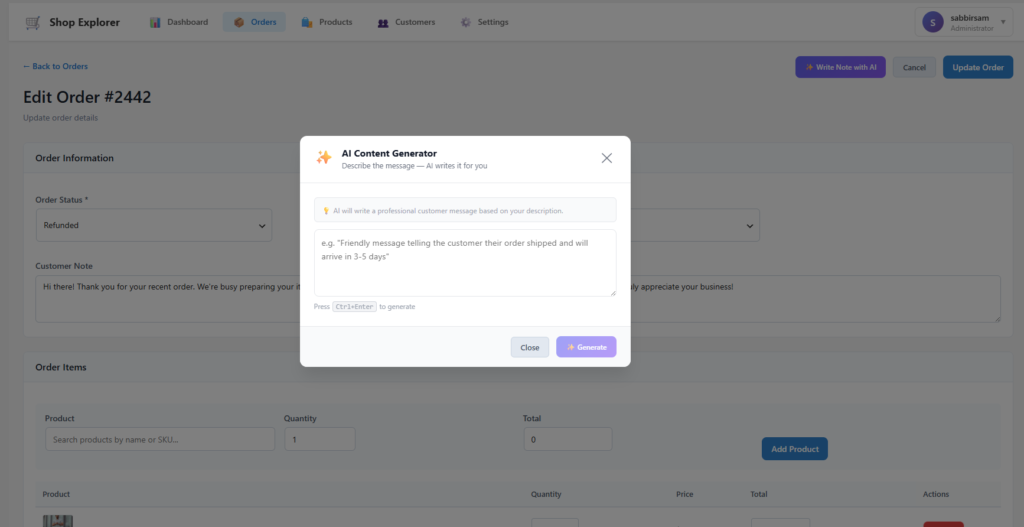
The AI integration extends beyond WooCommerce AI product management into your order workflow. Navigate to Shop Explorer → Orders and open any order. You will find an AI Integration panel on the right side of the order screen.
How to Write an AI Order Note #
- Open any order in Shop Explorer
- Find the Customer Note panel in the AI Integration section
- Click Write Note with AI
- Enter a prompt: “Create a customer note based on this order.”
- The AI reads the order details (items, totals, customer info, status) and writes an appropriate note
- Review the note and click Update Order to save
This feature is especially useful for stores processing high order volumes where writing individual notes for each customer is time-consuming. The AI produces context-aware notes that reference the actual order items and status.
Step 5 – Analyze Your Store with the AI Revenue Copilot #
Navigate to Shop Explorer → Analytics. This section provides a comprehensive dashboard covering customer analytics, order trends, revenue charts, top-selling products, cart abandonment statistics, and more. The AI Analysis sub-section at the bottom is where WooCommerce AI product management meets store intelligence.
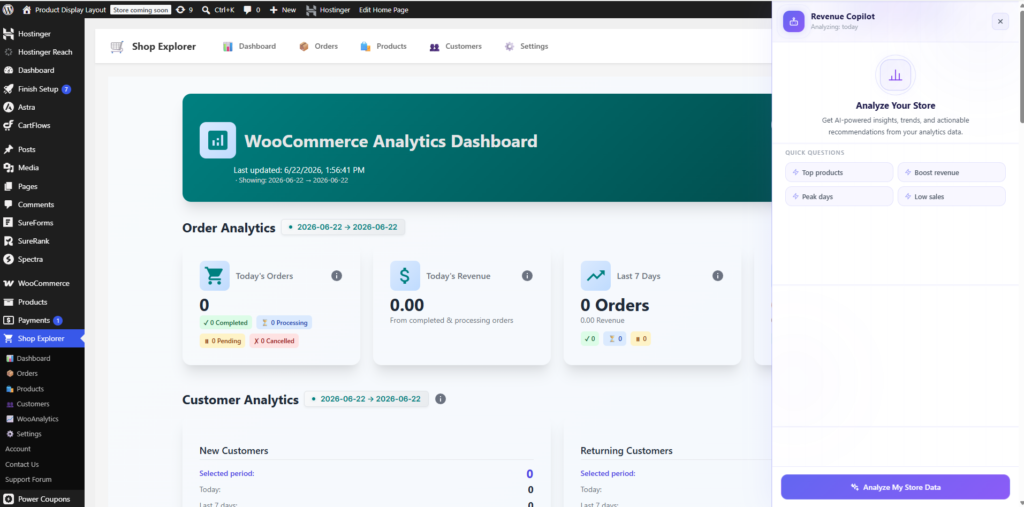
What the Analytics Dashboard Covers #
- Customer Analytics – lifetime value, purchase history, segmentation
- Store Overview – total revenue, orders, average order value
- Order Status Breakdown – pending, processing, completed, refunded
- Order Trends – daily and weekly order volume patterns
- Top Selling Products – your best performers by revenue and quantity
- Revenue and Orders Graph – interactive charts with date range filters
- Daily Revenue Charts – granular daily breakdown
- Product Performance Details – per-product revenue and conversion data
- Incomplete Order Analysis – how many orders were abandoned mid-checkout
- Abandoned Cart Statistics – cart abandonment rates and value lost
- Cart Interaction Analysis – what customers add and remove from carts
- Most Abandoned Products – products customers add to cart but never buy
Run an AI Store Analysis #
In the AI Analysis section, click Analyze My Store. The AI reviews all available store data – revenue history, customer behavior, order patterns, refund rates, cart interactions – and returns a prioritized list of recommendations.
The AI does not just show you data – it interprets it. For example, if your store has a 100% refund rate on recent orders, the AI flags this as a critical issue and suggests addressing it before running promotions. This kind of contextual insight is what separates AI-powered WooCommerce management from standard analytics dashboards.
Ask Custom Questions with the AI Revenue Copilot #
Beyond the automated analysis, you can type any question into the AI chat interface. The AI responds based on your actual store data – not generic advice.
Example questions you can ask:
- “How can we boost our sales this month?”
- “Which products have the lowest conversion rate?”
- “What are my peak sales days?”
- “Which products are most abandoned in carts?”
- “What should I do to recover incomplete orders?”
You can clear the conversation at any time and start a new analysis session. The AI Revenue Copilot is available on every analytics page visit, giving you an always-on store intelligence assistant built directly into your WooCommerce dashboard.
WooCommerce AI Product Management: What You Can Do #
Here is a summary of everything available through the AI integration in Shop Explorer:
| AI Feature | Where to Find It | What It Does |
|---|---|---|
| Generate Product with AI | Products → Add/Edit Product | Creates product name, price, SKU, stock, descriptions from a prompt |
| Improve Product Descriptions | Products → Edit Product → Generate with AI | Regenerates short + full descriptions for existing products |
| AI Customer Note | Orders → Open Order → AI Panel | Writes context-aware notes based on order details |
| AI Store Analysis | Analytics → AI Analysis → Analyze My Store | Reviews all store data and surfaces priority recommendations |
| AI Revenue Copilot | Analytics → AI Analysis → Chat | Answers custom questions about your store performance |
Frequently Asked Questions #
Is the AI integration free to use? #
The AI integration itself is included in Shop Explorer. However, you need an API key from your chosen provider. Google Gemini offers a free API key through Google AI Studio, making WooCommerce AI product management accessible at no additional cost for most stores. Other providers like OpenAI and Anthropic charge based on usage.
Which AI model is recommended for product creation? #
For most stores, Gemini 2.5 Flash delivers the best balance of speed, quality, and cost. It handles product descriptions, short descriptions, and field population reliably. If you need richer long-form content, consider Anthropic Claude 3.5 Haiku or GPT-4o.
Can I use multiple AI providers at the same time? #
Currently, Shop Explorer uses one active AI provider at a time. You can switch between providers at any point by updating the AI Integration settings. Your previous API key is not deleted when you switch – just update the field with the new key.
Does the AI have access to my customer data? #
When you use the AI Revenue Copilot or generate order notes, Shop Explorer sends store analytics data (order totals, product names, status information) to your chosen AI provider’s API. No personally identifiable customer data (names, emails, addresses) is transmitted. Always review your AI provider’s data processing terms at Google AI Terms or your provider’s equivalent page.
What if the AI content generator fails or gives an error? #
The most common cause is hitting the free tier rate limit on Gemini Flash. Switch to Gemini 2.5 Flash in the model selector and try again. If issues persist, verify your API key is active by clicking Test Connection in the AI Integration settings.
Conclusion #
WooCommerce AI product management through Shop Explorer removes the manual bottleneck from store operations. Whether you are creating a new product from a short prompt, improving descriptions across an existing catalog, writing personalized order notes, or asking your store data direct questions – the AI integration handles it all from one dashboard. Connect your provider in minutes, enable the required tracking options, and start saving hours every week on tasks that used to require full attention.
Ready to set it up? Get Shop Explorer and connect your first AI provider today. Need help? Visit the Shop Explorer support page or check the full documentation for more guides.


Leave a Comment
Your email address will not be published. Required fields are marked *